Microsoft recently pushed out a notification, as below, that Teams PowerShell Module (TPM) older than version 4.x.x will be retired by 15 June 2022.
Microsoft Announcement MC350371
With this change, some of your Teams PowerShell scripts may need to be modified or updated. Or, you’d see some errors when executing. Here are some of things that I have come across recently:
The “PSListModifier is no longer supported, use a list or array to replace all items” error.
I came across this error when creating a new Online Voice Routing Policy with multiple Online PSTN Usages.
New-CsOnlineVoiceRoutingPolicy : OnlinePstnUsages as PSListModifier is no longer supported, use a list or array to replace all items
This error is due to the list operators like @{add="xxxx","yyyy","zzzz"} were supported in lower versions of TPM are now no longer supported. To execute the same command, you need to remove those operators and just list them out:
There are some changes to other cmdlets too. See here for the release notes.
Another consideration, although not strictly related to this version change, is to update your user and Auto Attendant/Call Queue Resource Account enablement scripts to start utilisting the newer Set-CsPhoneNumberAssignment cmdlet to replace the following cmdlets:
So, how do you find out what version you are on and how do you install a new module?
To retrieve the current version of your Teams PowerShell Module, run this command in a PowerShell window or in a PowerShell ISE session:
Get-InstalledModule -Name MicrosoftTeams
You would see an output like this:
Retrieve current Teams PowerShell version
Next, you can go check what’s available to download and install:
Find-Module MicrosoftTeams
If you want to see the pre-release versions instead of only the GA/stable versions, you can do so by including an extra switch:
Find-Module MicrosoftTeams -AllowPrerelease
At the time of writing, both commands returned the same version: 4.1.0
View available Teams PowerShell version to download
There is another switch can be useful if you want to rollback to an older version or install a specific version of Teams PowerShell Module rather than just the latest:
If you have ever tried configuring a Microsoft Teams Room account with a Direct Routing phone number and an Online Voice Routing Policy, you would most likely have encountered the error that I’m about to mention in this article.
Firstly, the Exchange Room Mailbox. I won’t go into too much details here because it has been well documented by Microsoft. But, in short, the Teams Room account will need to start its life as an Exchange Room Mailbox.
Once you have the Exchange Room Mailbox ready, you will need to give it the appropriate license (e.g. Microsoft Teams Rooms Standard). Next, it is only natural to proceed and enable it as a Teams Room. *Hint: Error is coming…
The normal procedure you’d expect would be:
Get the Registrar Pool info
Enable the account as a Teams Room account
Next, you would try putting the Direct Routing phone number on the Room Account.
And this is where you’d see an error that says:
Unable to Set “LineURI”. This parameter is restricted within Remote Tenant PowerShell.
In order to fix this, and give the Room account a Direct Routing phone number + Online Voice Routing Policy, we’d need to undo some of our steps.
Disable the account as a Teams Room account
Remove the license from the account. Give it a few minutes, and put it back on.
Configure the account as a normal user account for Direct Routing.
Convert the account into a Teams Room account by repeating the initial steps
Done!
I hope that could make your lives a little bit easier and save some head scratching.
Recently I came across a need to create and assign multiple phone numbers and Resource Accounts to an Auto Attendant in Teams. To do this manually, the normal procedure is:
Purchase the Phone System Virtual User licenses (FoC) via Microsoft or your CSP
Set Usage Location (country) and assign Virtual User license to each of the Resource Accounts
Go back to TAC (or use PowerShell) to assign a phone number to the Resource Accounts
It is not too bad if you only need to do that on a small number of Resource Accounts, but my recent encounter required me to associate 65 phone numbers to an Auto Attenant. The above manual steps would be end of my will to live.
So, I created a PowerShell script to do such task for me!
The script can carry out the above actions based on a CSV import.
You can choose to have the script to do all of it, or only some of it by skipping certain steps.
The script can’t do EVERYTHING EVERYTHING. So, there are certain things need to be in place before hand – you would most likely need to have them anyway.
The CSV file only need a few details for each Resource Account. It is rather self-explanatory. The only note is: populate the phone numbers without the leading + sign.
You can use any CSV editor you’d prefer. Excel sometimes try to be too clever for its own good by applying formatting to the phone numbers automatically. So, watch out for that.
To correct it, you need to set the cell to Number and get rid of the decimal points.
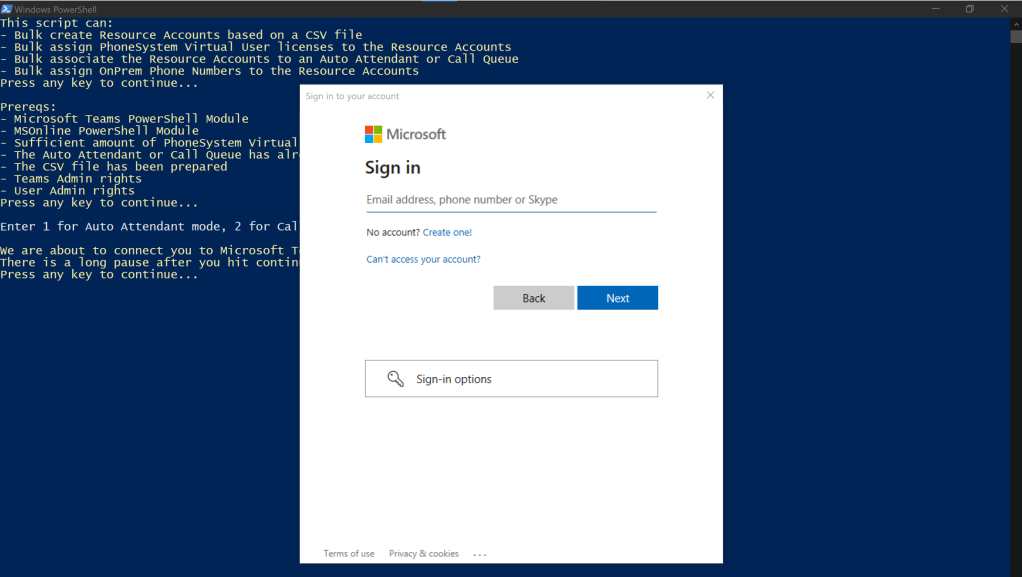
The script will start by asking you to set it to either Auto Attendant or Call Queue mode. This will set the tone for the rest of the script.
It will then give you a heads up to have your access credentials at hand.
After choosing to proceed, you will see the familar login pop-up.
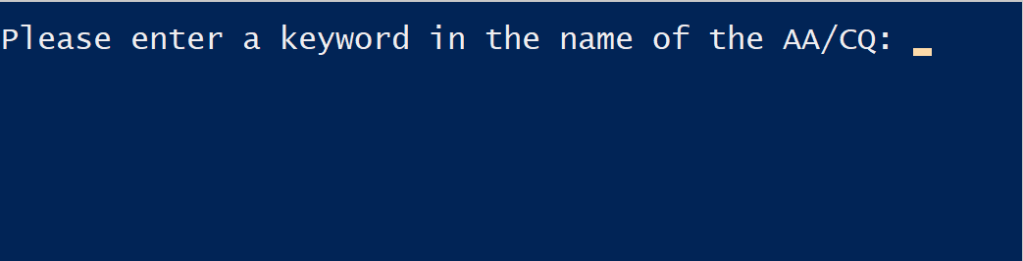
After successful authentication, the script will ask you for a AA/CQ search string.
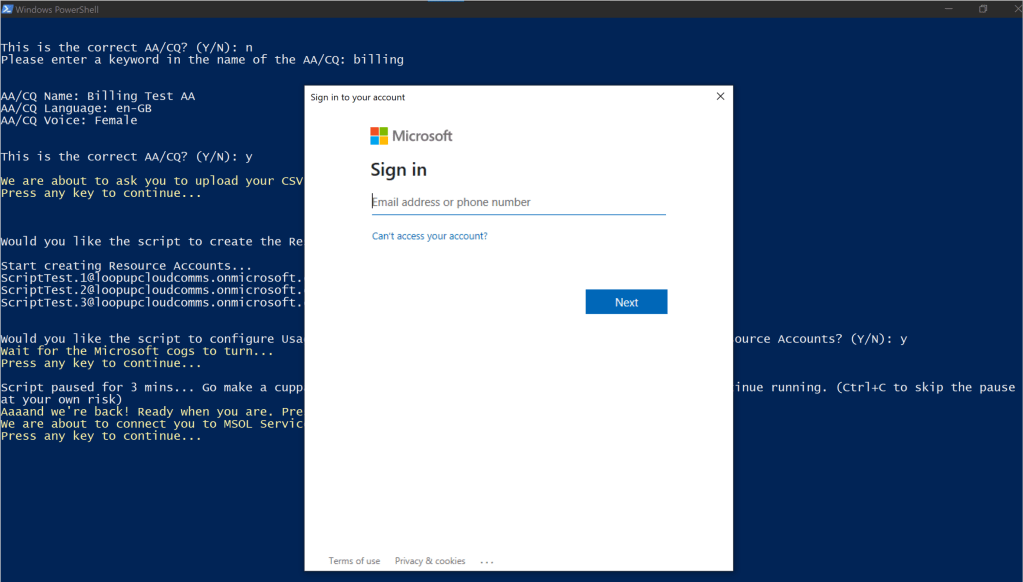
You don’t have to enter the full name of the AA/CQ. A partial name or a keyword would be sufficient for the script to run a search. It will return the search result and ask you for confirmation before proceeding further. If the returned the result isn’t the AA/CQ you are looking for, you can enter N to enter a new keyword to search.
Next up, is the CSV import. The script will pause and give you a heads up before prompting for the file.
Now the script will start the actual job at hand.
Creating the Resource Accounts
The script will first ask for your confirmation. You can enter N to skip this step of the script.
If you chose Y to proceed, the script will carry on to create the Resource Accounts listed in the CSV file.
Configuring Usage Location and assign Phone System Virtual User license
Same as above, the script will ask for your confirmation. You can enter N to skip this task if you wish to.
The reason these 2 steps are combined together is that although the Usage Location is not required when you create the Resource Account, it is mandatory when you assign the Virtual User license to it.
Once you have given permission, the script will proceed to perform the tasks. As you know, sometimes there could be a provisioning delay in Microsoft cloud. This could cause the script to error out and complain that the user accounts cannot be found. So, I have built a 3-minute pause into the script to avoid errors.
The script will promp you once the timer is up. Of course, you can leave it for longer if you wish to. (e.g. If you have a large amount of the accounts in the CSV list)
To proceed at this step, you’ll need to enter your credentials to authenticate against MSOnline service.
Once authenticated, the script will proceed to do its thing.
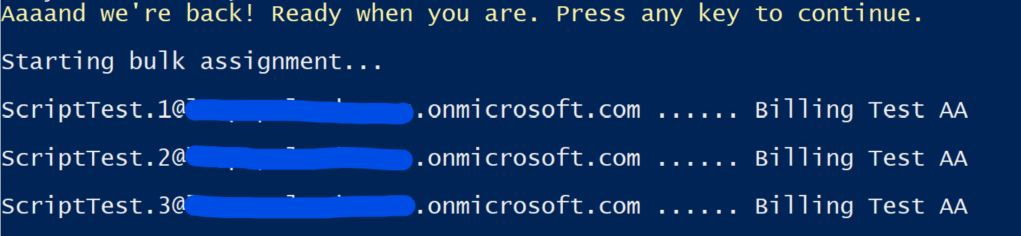
Associate the Resource Accounts to the Auto Attendant or Call Queue
Same as previously, you have to choice to say yay or nay. The script will skip this step if you don’t want it to do it.
As as before, there is built-in 3-minute pause here to avoid any provisioning delay that could cause the script to error out.
The script will prompt you to continue after the 3-minute timer.
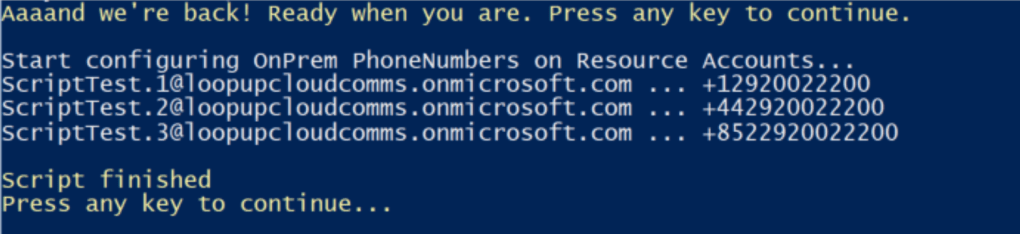
Assign OnPrem Phone Numbers to the Resource Accounts
You guessed it, you get to choose whether or not you want the script to do this part by entering Y or N.
And, yes, there is another 3-minute timer to avoid errors caused by provisioning delays at Microsoft’s end.
This is the last task for the script to carry out before it completes.
If you wish to, you can double check the assignment result in the TAC GUI.
Now the actually goodies. You can download the script and the CSV file example from here.
Microsoft announced that a new key feature, SIP Gateway, is now GA in Teams as of December 6, 2021. With this new feature, businesses will be able to repurpose their existing 3rd party SIP phones in order to have a smoother transition into native Teams phones without a steep initial hardware investment.
The full details are available in this Microsoft blog post:
Meetings have always been one of the core features in Microsoft Teams. I’m sure many of us have used the feature where you are in a Teams meeting and you dial out to PSTN to “drag someone in”. But, where do those calls go out from and who is paying them? It also gets interesting once you throw Direct Routing into the mix.
There are a few configurations where you’d be able to dial out to PSTN from Teams meetings:
Audio Conferencing License
The license needs to be assigned to the meeting organiser.
Each Audio Conferencing (pay monthly) subscription provides 60 minutes per user per month that can be used to dial out to non-premium numbers in ANY of the Zone A countries.
This includes:
Audio Conferencing license as add-ons (e.g. to E1, E3, etc.)
Audio Conferencing license included as part of another license SKU (e.g. E5, Teams Room Standard and Teams Room Premium, etc.)
Calculation
Tenant dial-out minute pool size is based on purchased licenses (not applied licenses). For example, if you have bought 100 Audio Conferencing add-on licenses but only 10 of them are actually assigned to users, you still get 100 x 60 = 6000 mins in the dial-out pool.
Monitoring
You can monitor and track the usage of this pool in the Teams Admin Center (TAC) under Analytics & reports, and then Usage reports. Select the PSTN minute and SMS (preview) pools and hit the Run report button.
Call Routing
In terms of call routing in this case, the outbound calls are routed out to PSTN via Microsoft and the Audio Conferencing dial-in number of the organiser (the number that’s on the meeting invite) is presented as the CLI to the callee.
Direct Routing
Can Direct Routing be utilised for Teams meeting PSTN dial-out? Yes!
In order to utilise Direct Routing, you’d first need to remove the Audio Conferencing license from the meeting organiser’s account. Although, as we mentioned above, the Audio Conferencing license comes with dial-out mins, the primary purpose of this license is to popluate a phone number in your Teams meeting invites and allow people to dial-in over PSTN. Therefore, by removing this license the meeting invites from the organiser will no longer contain a dial-in phone number. BUT, the PSTN dial-out from Teams meetings will now follow the organiser’s Direct Routing configuration as per the assigned Online Voice Routing Policy. The organiser’s DDI is presented as CLI to the callee.
[Edit: Thanks to David Chomca for pointing this out]
Adding another slightly more confusing scenario here:
If both the meeting organiser and the attendee (from the same org) are configured for Direct Routing and don’t have Audio Conferencing license, when the attendee initiates the dial-out from the meeting the call presents the attendee’s DDI as CLI but follows the meeting organiser’s Online Voice Routing Policy for call routing. Yep, confusing I know… but it was confirmed in testing. Thanks Microsoft! 🙂
What happens when you use up all the minutes in the included pool?
First of all, when you are running very low, the admin will receive a warning email from Microsoft. (Although the sender is still “Skype for Business”… Microsoft should really change that now.)
And another similar email will come when the dial-out minute pool is completely used up.
The dial-out overage is covered by Communications Credit. You’d need to purchase it as a free license SKU, top it up with money, and assign it to the users.
The credit is valid for a year (so don’t put too much in there in one go). You can set up auto recharge when it runs low.
What if you don’t have, or don’t want to have, Communications Credit to cover the overage? What would happen then?
When your dial-out minute pool runs out, any in-flight dial-out calls will be disconnected. Other attendees (joined from Teams or dial-in) would remain in the meetings unaffected. If you attempt to dial out from the meeting again, the call will fail and you will see an error message.
There is a cheeky little workaround at this point, if you have Direct Routing. So your organisation doesn’t have Communications Credit set up, and your inclusive dial-out minute pool is completely dry. But, there is a high profile meeting going on and the boss needs to drag someone in NOW. The quick-fix is: remove the Audio Conferencing license from the organiser’s account. Give it a couple of minutes, and people will be able to dial out from that meeting again. The call will go out via the organiser’s Direct Routing route.
Calling Restriction Policies
Quoting Ken Miles in the movie Le Mans 66 (or “Ford v Ferrari” for folks in the US of A), “there is no point of having a big engine if we can’t stop“. Having the ability to dial out from Teams meetings is great but we need to be able to apply some control when required.
Like everything else, this is policy controlled and can be applied in the TAC or using PowerShell.
From time to time, Teams admins may come aross the need to limit some (or all) Teams voice users’ calling capability to domestic-only. There are many different ways to implement this. But, I’m going to write up this method below as I found it to be the most effecient and can be used on both Calling Plan and Direct Routing.
First of all, there are 2 elements in this configuration. Their controls are in the same place but can be adjusted separately.
And, quoting Microsoft: “A call is considered domestic if the number dialed is in the same country where Microsoft 365 or Office 365 has been set up for the organizer of the meeting (in the case of audio conferencing), or the end user (in the case of end user PSTN calls).” So, please make sure you set the license usage location correctly (Well, you’d need to have the correct region anyway to have the correct dialplan applied).
So, the underlying policy that is responsible for this setting is this one: OnlineDialOutPolicy
There are many pre configured policies in Teams, and you can view them using the following GET command:
Get-CsOnlineDialOutPolicy
The default Global policy allows dial out to all destincations on both.
You can view what policy is granted to the user by running the Get-CsOnlineUser command against the user account. The attribute you are looking for is OnlineDialOutPolicy. If the value is blank, the Global policy is applied.
To change the policy configuration, you can use either the GUI/TAC or PowerShell.
GUI/TAC (Audio Conferencing Dial Out)
Log in to TAP
Go to Users, and select the user you want to change
Click the Edit button next to Audio Conferencing
Go to the “Dial out from meetings” drop-down menu.
Select your desired option.
Click Apply.
As an example, seleting “In the same country or region as the organizer” here is in effect setting the policy to DialoutCPCDomesticPSTNInternational (Verifed by runing Get-CsOnlineUser)
This policy allows domestic dial-out from conferences and leaves end-user PSTN dial-out as default, which allows international dialling.
GUI/TAC (End User Dial Out)
Log in to TAP
Go to Users, and select the user you want to change
Go to Voice tab, and click the “Dial-out settings for calling” drop-down menu
Select your desired option. There is no need to click apply.
As an example, seleting “In the same country or region as the organizer” here is in effect setting the policy to DialoutCPCInternationalPSTNDomestic (Verifed by runing Get-CsOnlineUser)
This policy allows end-user PSTN dial-out to only domestic destinations, but leaves conference dial-out as default which allows all destinations.
PowerShell
As you may have guessed, it is easier and more flexible to apply this configuration using PowerShell.
You can use the following line to grant the policy to user accounts:
For everyone who has been doing Teams Direct Routing deployments, the famous “Cannot find specified Gateway” error would definitely be up there being one of the most dreaded errors to see.
Cannot find specified Gateway error in PowerShell
There are a couple of places you may see this error, depending on the format of Teams Direct Routing you have chosen to configure:
Single tenant
Add the SBC FQDN as a domain in Microsofte 365 Admin Centre, and complete verification
Put a user account in the newly added domain
Assign a license to the user account to activate the domain (E.g. Business Basic or E1, or above)
You wait… I have seen the domain finish being activated in about half an hour but this step can take up to 24 hours
You come back to create the PSTN gatway by running New-CsOnlinePSTNGateway cmdlet
BAM!! Cannot find specified Gateway
Multi-tenant
Add the SBC FQDN as a domain in Microsoft 365 Admin Centre, and complete verification
Put a user account in the newly added domain
Assign a license to the user account to activate the domain (E.g. Business Basic or E1, or above)
You wait… I have seen the domain finish being activated in about half an hour but this step can take up to 24 hours
You skip the step to create the PSTN gatway if your provider use the derived trunk topology
You create the Online Voice Routes by running New-CsOnlineVoiceRoute, which reference the Online PSTN Gateway
BAM!! Cannot find specified Gateway
I have seen my fair share of the this dreaded error, and would like to summarise the scenarios to save some time and head scratching for you, my fellow Teams Direct Routing deployers.
Domain not activated
This could be one of the followings:
You, my friend, have forgotten or didn’t think of adding a licensed user account to the newly added domain to activate it. Solution: Add a licensed user to activate the newly added domain.
You, my friend, have made a typo in the domain name. E.g. Your carrier tenant SBC is “sbc1.contoso.com“. You were allocated an FQDN of “customer.sbc1.contoso.com“, but when you added the domain in your Microsoft 365 Admin Centre you actually typed in “customer.sbc.contoso.com“, which looked correct but it was not. The domain verification would have gone through without a hitch because ultimately the “contoso.com” domain belongs to the same service provider. You assign a licensed user account to the wrong domain and activates it. You will 100% see Cannot find specified Gateway when you create the Online PSTN Routes because your command would reference the correct FQDN. Similar error could also happen in the single tenant configuration. However, because the SBC FQDN is generally shorter, it is easier to spot. Solution: Delete your typo domain, and add it back in correctly, and activiate it with a licensed user account.
A Microsoft side issue
Although the occurrence is rather rare, I have actually encountered this scenario recently on a deployment.
I did everything by the book, but still hit the error after 48 hours of waiting.
Licensed user account to activate domain
In fact, I added multiple domains at the same time using the same method, but only 2 of them got “stuck”. So, I opened a support case with Microsoft. The support engineer went through everything with me on the phone, and checked the domains from his side, but he couldn’t see anything wrong. He then asked me to put additionallicensed user accounts to the domains in question. I had my reservations but did what he asked.
Additional licensed accounts for activation
Guess what, the domains came to life after 30 mins. Very strange! I asked him what was the problem? His answer was “The accounts that were created could initiated a sync and resolved any errors.” I will update this blog if he comes back to me with a more detailed RCA.
Microsoft support case respond
So, there you go, if you have done EVERYTHING correctly but still seeing the error, try putting addtional licensed user accounts to the newly added domain for activation.
Microsoft documentation
If you Google this error you would also come across a Microsoft article (Link), specifically in the multi-tenant scenario.
Microsoft documentation on the “Cannot find specified gateway” error
As you can see in the screenshot above, Microsoft suggests EV enable the domain activation user account. The only issue I have with this is that most of the people and companies would use lower tier licenses for this purpose. E.g. Business Basic or E1. Which means, you’d also need to put the Phone System add-on to the activation account to enable Enterprise Voice. However, if you do have a bunch of spare E5s that can be used to do domain activation, or don’t mind adding Phone System to the activation account, this could be another fix for you if you are seeing this error. I haven’t tested it myself but I think it’d have the same effect as when they asked me to add additional licensed users to the domain in question – to initiate a sync and resolve any errors.
So there you go. I will update this blog if I come across any more scenarios or fixes. I hope I can save you some time and head scratching on your journey of Teams Direct Routing. Have fun!
Back in December last year, Microsoft communicated that the Skype for Business Online Connector will be retired by February 15, 2021.
Microsoft Announcement MC230065
Well, that date is pretty much upon us. If you manage or deploy Enterprise Voice in Teams, you would have been using the SfB Online Connector to establish your remote PowerShell sessions. Therefore, this is quite an important part of Microsoft Teams voice. In case you haven’t already swtiched over to Teams PowerShell module, this is what you need to do:
Uninstall Skype for Business Online module in Control Panel
You know the drill… go to Start\Control Panel… etc. etc.
Check your current PowerShell version
Run the following command in an elecated PowerShell window
Get-Host | Select-ObjectVersion
NOTE: Although the latest version is PowerShell 7, Microsoft recommend to use 5.1 with Teams Module due to some known issues with version 7.
Update the PowerShellGet module
Run the following command in an elecated PowerShell window
Install-ModulePowerShellGet -Force -AllowClobber
Close and restart PowerShell window (elevated)
Uninstall your current Teams module(s) – if you have any
Run the following command in an elecated PowerShell window
Uninstall-ModuleMicrosoftTeams
Verify the removal
Go to this directory and make sure you DON’T see a “MicrosoftTeams” folder
C:\Program Files\WindowsPowerShell\Modules
Find the latest version of Teams module
You can find the latest preview version by running the following command in PowerShell
Find-ModuleMicrosoftTeams
Optionally, if you want to try out the prerelease you can use the following command:
Find-ModuleMicrosoftTeams-AllowPrerelease
Install Teams module
Run the following command in an elecated PowerShell window
UPDATE: With the latest MicrosoftTeams Module, the New-CsOnlineSession is no longer needed. In fact, it’ll actually give you an error if you try to run it. You now only need 1 line to connect and manage everything in Teams:
Connect-MicrosoftTeams
I hope I have been helpful. Thank you for reading!
Direct Routing for Microsoft Teams is great. The voice routing configuration for Direct Routing, however, isn’t the easiest concept in the world to understand. I’d like to help people understand it to get the most out of Microsoft Teams voice. So here is my attempt on explaining the topic.
Before we begin, I’m more of a PowerShell guy than GUI when it comes to Team config. So this article will be based on configuring voice routing with PowerShell.
Key concepts
Online Voice Routing Policy – This is what we aim to create. This is the policy, or policies, to be assigned to user accounts to tell them where/how to route their calls. We’ll use the next 3 elements to contruct Online Voice Routing Policies.
Online PSTN Gateway – This is the reference, or pointer, to your Session Boarder Controller (SBC).
Online Voice Routes – Define the number pattern to match for routing purpose, using the good old RegEx, and associate it with the destination SBC.
Online PSTN Usage – A container, for Online Voice Routes, that can be referenced by different Online Voice Routing Policies.
Scenarios
Single route – This is the simplest form. All calls are sent to one SBC.
Load Balance – Same type of calls are sent to multiple SBCs for resiliency or load sharing.
Failover – Same type of calls are sent to a preferred SBC, and get rerouted to a backup SBC(s) when the preferred SBC is unavailable.
Least Cost Routing – When multiple SBCs in different countries and regions are available, calls can be routed based on the destination country to the in-country SBC. (Please be mindful of local legislation in this area.)
Configurations
Single Route
This is the simplest form of call routing. Only 1 SBC in the topology and all calls are routed to that 1 SBC.
First of all, we need to create the Online PSTN Gateway and an Online PSTN Usage. You’ll see that the Online PSTN Usage record is placed in a “Global” container. This container is literally here to hold these PSTN Usage records. You can’t change the name or create a new one with a custom name.
Next, we create an Online Voice Route. The RegEx number pattern here is saying “anything start with a + sign, followed by minimum 3 digits”. This is pretty much all phone numbers in E.164 format. Then associate it with our one and only SBC, and assicate the Online Voice Route with our Online PSTN Usage that we created in the previous step.
Next, we can contruct the Online Voice Routing Policy by creating a new one and add our Online PSTN Usage to it.
The last thing to do is assign our new Online Voice Routing Policy to the users.
Load Balance
When you have multiple SBCs at hand, you can create the voice routing config to route the same type of calls to multiple SBCs for resiliency or load sharing. Well, technically, this is probably more “resiliency” than “load sharing” because Microsoft’s official wording is “the SBCs in the routes are tried in random order”.
First, we need to create multiple Online PSTN Gateways and our Online PSTN Usage. In our example, we have an SBC in the UK and one in the US.
Next, we create our Online PSTN Route with the same catch-all RegEx pattern, but this time with 2 SBCs associated instead of 1. And then associate the Online Voice Route with the Online PSTN Usage that we created in the previous step.
To construct the Online Voice Routing Policy, we can simply pick up the Online PSTN Usage that we have just created and drop it in to a new Online Voice Routing Policy.
Finally, assign the policy to all users who need to be using Direct Routing.
Failover
What if you don’t want “the SBCs in the routes are tried in random order”? What if you want to set a preference in the routes? Like in our example, we have an SBC in the UK and one in the US. If the majority of our user base is in the UK and Europe, we’d want to use the UK SBC as the primary route and the US node as a failover route.
There are a few things that we need to do differently to achieve this.
Instead of creating 1 Online Voice Route with the catch-all RegEx pattern and associate it with 2 SBCs, we need to create 2 Online Voice Routes and each has 1 SBC associated.
The voice routes are weighed. By default, the ones get created ealier has a higher priority but you can change this later by using the “-priority” switch in the “Set-CsOnlineVoiceRoute” cmdlet.
Next, same as before, drop the Online PSTN Usage into a new Online Voice Routing Policy.
Now the policy is ready to be assiged to the users.
Least Cost Routing(LRC)
When you have mulitple regional SBCs available, you have the option to take advanage of Least Cost Routing. For example, if we have 3 SBCs in 3 different locations: US, UK and China. We could configure voice routing in such way that when our users call one of those countries the calls are routed via the SBC in the corresponding country, and therefore charged at national instead of international rate. Please be mindful, though, that not all countries in the world allow such configuration to bypass local telco. Please check local legislation before implementing such configuration.
Firstly, let’s create our 3 SBCs and our Online PSTN Usages. As shown in the diagram below that this time we are creating a lot more Online PSTN Usages than the scenarios above. This is because that for each country we want to specify the per country LCR routes at the top and everything else get routed via the “local” SBC.
Next, we need to create some Online Voice Routes, 6 in fact. 3 regional routes, each with spcified country codes (+1 for US, +44 for UK and +86 for China) and associated with the corresponding in-country SBC; and 3 catch-all routes for each country. We zoomed in on one of the Online Voice Routes.
We now need to construct 3 Online Voice Routing Policies, one for each country. The zoomed-in example below is the UK policy where calls to the US (+1) are routed to the US SBC, calls to China (+86) are routed to the China SBC and everything else are routed “locally” to the UK SBC.
Now we assign the Voice Routing Policies to the users in the corresponding countries.
Of course, you can mix n’ match with these configurations – e.g. LCR + Load Sharing, or LCR + Failover, etc.
I hope I have made it a bit easier to understand with the examples and diagrams. Have fun with Teams voice!